Showing posts with label Cuttlebug. Show all posts

Wednesday, October 10, 2012

WYEGW - use negative space from a shadow feature


I decided I need to make some cards that are a little more simple, but are still way better than store bought ones. So I took the challenge of making something with the negative image from a shadow feature on the Cricut.

I used the Celebrations Cartridge and went for a birthday theme.
I made the balloon and threw it into a box for later use. I then took the negative image left behind on the paper, embossed it and backed it with pink glitter paper. I then added a little ribbon bow. I wanted there to be space on the bottom right side so I can add numbers later, when I know whom the recipient will be.

Yep, its simple but still has a little extra something that you cant buy at a store. It is also easy so I can make a bunch and have them stored for a "OMG! I forgot!" birthday card.
 Not that I have ever done that! ;)

Thanks for checking out my project! Be sure to check out the rest of my blog for past projects that you may have missed!

You really should go and check out the rest of the Design Teams projects..they are amazing!!

Friday, August 3, 2012

August 100 Cricut Cartridge Blog Hop

 
Welcome to Erica's Craft Room
100 Cricut Cartridge Blog Hop Day One
You should have started at http://mycricutcraftroom.blogspot.com/ if not please start at the beginning.

Welcome to My Cricut Craft Room's August 100 Cartridge Blog Hop

Collectively the design team uses over 100 different Cricut Cartridges in their projects during the two days of this hop.
 What an exciting weekend!!

As special treat enjoy 10% off of your total purchase with Erica's Craft Room Store.
Use the code AUGUST to see 10% off of your total purchase (No exclusions)


I have made a few projects to share with you today, so lets go check them out..

My first project was done using the Robotz and Indie Art Cricut Cartridges.
Obviously my fingers are not included in the card, but I couldn't get the lil booger to stay closed long enough for its picture! He was just bursting with excitement for his big debut! LOL


I opted to make a dimensional card that I learned how to make from a pin I found on pinterest. I wanted something that can stand and be displayed on its own, but not necessarily an easel card.


The robot is cut at 5 1/2" and the large gear was cut from the Indie Art cart at 6 1/2". the smaller gear that is directly under the robot was cut at 4 1/2".

I made my next project using Word Builders; A Word Party. I made this for my 2 year old nephew, we are going to frame it and hang it in his room.


What a cute cartridge! I have had this one for awhile , but never used it! Boy was I missing out! Look how cute this is!!
Everything was cut at 5".


I altered the train by taking off the cow pusher.( because we all know Thomas doesn't have a cow pusher! LOL)
This cartridge does not have many "layers" so I made my own :)
 And, (although I think it would be a great idea for a cartridge,HINT, HINT)  I drew my own "Thomas" face. Its not perfect, but Johnny doesn't care! LOL
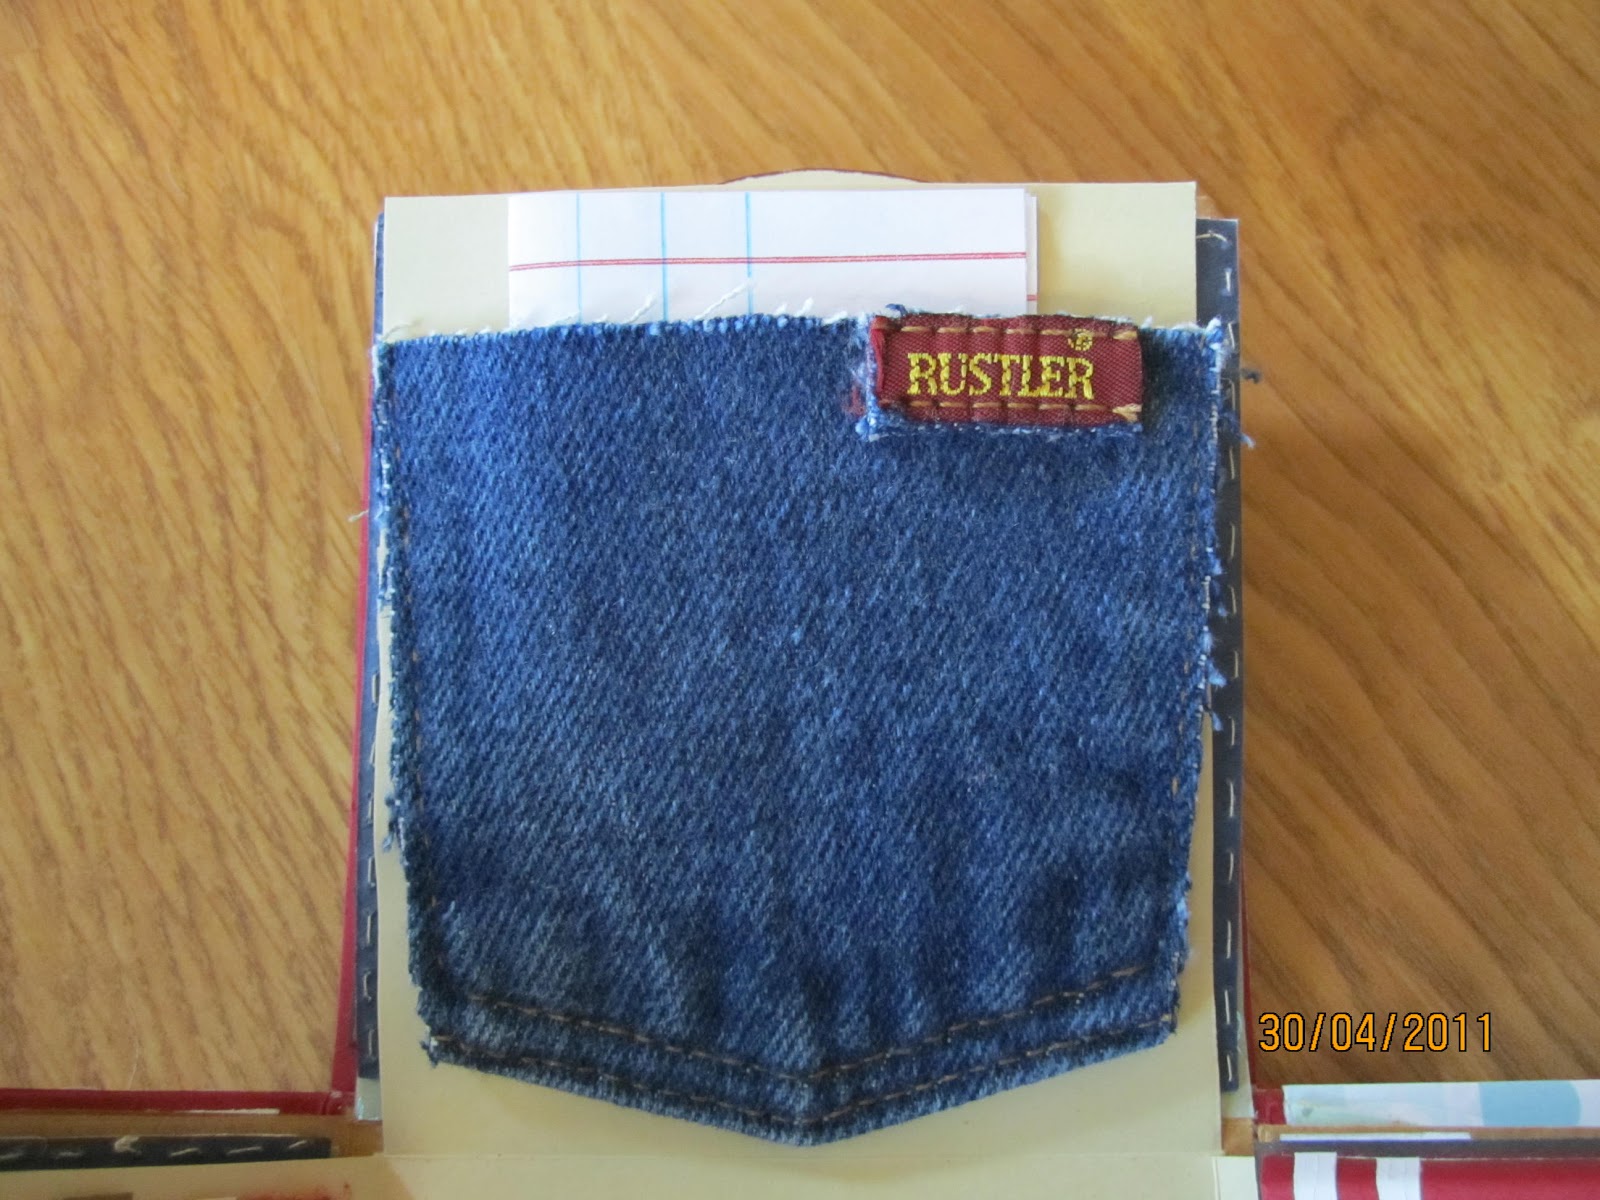

Notice how his name is long enough to use all of the rainbow colors?
So this project is becoming a multiple learning tool too!


Now, notice something else? Thomas is #1 and the Caboose is #8..now he can learn to recognize his letters, name, colors and numbers!! (I will be adding the remaining numbers to the letter cars, and brads in between everything to hold it together at a later date to finish the project)
DANG! I am a great Aunt! LOL

All of the black that you see on the project is actually a marker. My intention was to laminate all of these and let him play with them, and didn't want all of the extra bulk, but Thomas turned out so well that we decided to frame it...don't worry I will make him one to play with too! :)

Onward to the next project..shall we?..

I made a card using Elmos Party and Create a Critter Cricut cartridges.
I was in a mood to make a landscaped card. I am not sure if that is its official name, but it is what I call it. And I wanted to be able to use the cartridge for something other than a kids party, so I challenged myself to think outside the box and try something new..again!


Who doesn't love watching Elmo fly his kite in the park?!!


Elmo was cut at 2" using the Elmos Party cartridge and the trees and sun were cut at multiple sizes from the Create a Critter cartridge.
I love this card..it is simple but complicated.


Bonus Project!!

I made an extra project, a fun card (and matching envelope of course) for my not so little anymore cousin graduating from Luther college..and yep I used the Elmos Party! ( I told you I wanted to use the cartridge for something other than a kids party!)


All of the notes were cut at various sizes.

I embossed the music notes with my cuttlebug folder, I also hand embossed all of the raised notes on the card and envelope with my ScrapBoss embossing tools.


He is a very talented young man and although he sings more than plays piano, I will always remember him astonishing us while playing on Nanas piano at such a young age. He has an amazing future to look forward to and we are so proud of him.

I hope you enjoyed my very long blog today. Now its time for you to hop on over to


If you get lost along the way, here is the line up..
MCCR http://
mycricutcraftroom.blogspot.com/ jenn lorist http://
www.jennspapercrafts.blogspot.com/
Teresa http://
www.createenjoyshare.blogspot.com/
Kathy http://
3spoileddogs.blogspot.com/
shelley http://
shelley-scrapbookingforfun.blogspot.com/
heather http://
heathernovinger.blogspot.com/
Jessica S http://
jessicascraftshaque.blogspot.com/
Tammy - http://
www.Cuttinandstampin.blogspot.com/
Jen L http://
www.mybusycraftylife.blogspot.com/
Erica's Projects http://
ericasprojects.blogspot.com/
Samantha http://
www.samanthascricutcreations.blogspot.com/
robin http://
create-a-latte.blogspot.com/
amy http://
clayfulimagination.blogspot.com/
Miranda http://www.nanasscrapspot.com/
Angie http://
crazyscraplady-angelpie.blogspot.com/
LB http://
www.coolbeansbylb.blogspot.com/
Cathy http://
cathyplus5.blogspot.com/
Claire http://
threewaterscreations.blogspot.com/
Lisa Carrier http://
ourcraftingcorner.blogspot.com/
Blog Candy http://
ericasblogcandy.blogspot.com/


Tuesday, July 17, 2012

Card Sketch Tuesday


Thats right! Its card creating Tuesday again! This week I chose to do the sketch project..(MCCR posts a picture of a card sketch and I have to make my version of it)..sounds fun right?! NOT! My creativity doesnt like to be bound by restrictions, it likes to do whatever it wants! LOL So this was definitely a challenge for me!  

Here is the sketch..


I will admit, I made a card and I HATED it!

Oh look, here it is now..

yep, definitely not my best work..I am sorry you had to see it. Please forgive me if I have scarred you! LOL

So after scrapping that card into the trash bin, banging my head on the wall, and finally sorting my thoughts, I came up with this..


Ahhh..yes! Much better I say!
It looks like the sketch, and I am not as ashamed of it as I was my other card :)


I cut a large scalloped circle with my cricut, and cut my dress from that. I then embossed it with my cuttlebug folder.  The border was made using my EK punch, and I kept a few swirls to add next to the dress. The hearts, rings and bells were stamps I had from Creative Imagination.

I hope you enjoyed my card, and I hope it inspires you to make something outside of your box too!
Please go to mycricutcraftroom.blogspot.com for more fantastic designs and creative mind candy from my Design Team sisters!
See you next time!

Sunday, July 8, 2012

Barn Explosion Box

Hello!
  It's official, I am a new member of Ericas Craft Room Design Team! I am so excited!
  I have never shown anyone other than my friends and family my creations and boy am I nervous! ( am so nervous that I restarted a bad habit that I havent done in at least 20 years..nail biting..ugh! My long and wonderful nails are now nothing but little nubs.)  I decided to enter a contest thrown by Erica and things started to roll from there. I didn't win the contest, but I may have won something much more meaningful..a spot on her team.
   I want to share with you the card that I made and submitted for consideration to be on the team. I was only allowed to send one photo, but there is so much more to this card than whats on the outside. Lets begin shall we?...
Shes a bute isnt she Clark?
This is my first (and possibly last) attempt at an explosion box. I made this for my some day father-in-law for his 60th birthday.  I was inspired by one that I found on youtube.com by BugJunkie, you should really check her stuff out!
This is going to be a loooong blog for the simple fact that this card is so complex. (Please dont mind the date in the corner..I have yet to figure out how to set the darn thing!)
There are little mice hidden throughout the entire card. This is in the upper hay loft on the front of the card.

Left side of the barn
Back of barn

 Hay loft in the rear of the barn
 Right side of the barn.
Now Lift off the lid (hay loft) and what do you get?..
                                                                A whole lot of something!
When pigs fly!
We do love our corn here in Iowa!
Now lets get started on our chores!
Wonder whats in the pocket?

Its our chore list!
Looks like we better go to the tractor barn and get the ole tractor out.
Tractor barn

Well by golly someone tied birthday balloons to the tractor!
Next we better check for eggs in the chicken coop..
Looks like we got us some Birthday eggs!

Now we better get some carrots for supper tonight..
Looks like some-bunny else had the same idea!

That darn pig is stuck in the mud again! Better get him out!
awww..another special message.
Next we better find out what that aweful smell is in the silo.
I guess thats just the skunks way of saying it!
Eww! Better clean up the bull...poo
Now if that isn't a load of bull!
Oh No! The sheep got out! We better count them to make sure we have them all! 
1..
2..
Oh my, there are so many..
Yep, we got them all!
Now its time to feed the horse.
We have to lead him to his feed.
Now there is a happy horse.
Happy Birthday Stan..time for cake!  But first you better open up your birthday card!
Pull the card out of the pocket
Now hurry up and open it! Just because you are getting old doesnt mean you have to be so slow!
Yay! CAKE!!
But thats not all folks..Don't call me crazy until you have seen it all, because on the back of every page I paper pieced and hand stitched Connies favorite quilt blocks.
And finally its time for the sun to set...
(Now you can call me crazy! :))
This little project of love took me over 100 hours to complete, but the look on his face and everyone elses as they were playing along, was worth every second!

I hope you enjoyed looking at my explosion box and I hope to see you back again soon:)