Sunday, September 30, 2012

Halloween Decor-Theme Day Thursday


I did it, I finally did it! I bought the Happy Hauntings Cricut Cartridge last year for the 3D mansion..and had yet to make it until this week! I am so excited..it was complicated but so worth it! My son really wanted it to go along with the haunted house I made previously so so we could decorate the kitchen table and then he can play with it!
I used the thickest cardstock I had available and went to work..

I started with the first cut with the "Fit to Page" function button pushed on my Cricut..it cut at 7 1/2" So I continued with the rest of the cuts at the same size.
Now, to learn from my mistakes..be sure to keep the correct side facing outwards! As I folded the roof and attached the fence and windows, I went to placeit on top and realized I had flipped it and then it  wouldnt fit! AHHH!! LOL
It turned out so cute! I think I am going to allow my son to add this to his haunted town collection and I will make another. But this time I am going to omit all of the yellow behind the windows and place a battery operated tea light inside. I cannot wait to try it!
I hope you enjoyed my project today!
Make sure to check out the other Design Team members Halloween Decor or party goods at http://mycricutcraftroom.com


Wednesday, September 19, 2012

WYEGW Use as many cuts as possible


Who has the best Auntie ever?!! Lily and Johnny do!!
For my project this week I chose the challenge of using the most cuts and / or cartridges for a project.
I decided it was time to finally make the magnets for my niece and nephew. I have been wanting to do this for quite some time and just haven't gotten around to it (pretty much the story of my life! LOL).
I found the idea on pinterest (of course) to get an under the car oil drip pan and use it for magnets instead of having to use a fridge (theirs is stainless and wouldn't work anyway) or painting a wall to be magnetic (I know my brother wouldn't approve of that).  Finding the pan was easy..then it was just a matter of finding the time to make all of the magnets!!
I decided to start with the Paper Doll Dress Up cartridge to make them some magnetic paper dolls with changeable outfits. I cut everything at 4".
The bear, pig, and frog are from Create a Critter but they are in the pic because I had already laminated them..

After cutting everything out, I detailed it and laminated it with contact paper. I then added a piece of magnet that I cut from a long coil that I bought at JoAnns..with a coupon of course! LOL
I just LOVE them!
When I was taking pics of the laminated pieces I found that it was really difficult to get a good picture without a terrible glare so the rest of the pics are taken before I laminated them.

I then moved on to the Create a Critter cartridge because who doesn't LOVE it? And I know the kids will love all the animals!
I made almost everything the cartridge had to offer..and I swear the book was getting thicker with every page I finished! It was never ending!! LOL


The submarine came from the Lifes a Beach cartridge. I wanted to be sure johnny had a vehicle to play with under the sea :)


Can you believe how many items are on that cartridge?! YIKES!  Or should I say WOULD YOU HAVE EVER GUESSED? LOL I started to feel like I bit off more than I could chew!
128 cuts so far...YAY!!
Unfortunately I made a whole bunch of the Sesame Street characters but I cannot get the pics to load
:( BOO HOO!! I will post them as soon as I get them to load..promise! It is quite sad because those little guys are really time consuming to make..there are tons of pieces and they of course are not big pieces usually! LOL But they are sooo cute and well worth making!
So again..who has the best Auntie ever? LOL Lily and Johnny do..of course!  :)

Thanks for checking out my project this week..be sure to check out the rest of the Design Teams take on today's challenge!


Sunday, September 16, 2012

Cricut Craft Room Guide


The Cricut Craft Room Help Guide is 78 pages and
you can download it by clicking this picture. .....

When you open Cricut Craft Room now there is a GREAT video that pops up and welcomes you to Craft Room. If you have ever been intimidated by the idea of Craft Room…. NOW is your chance. There is a 4 minute video that welcomes you to Craft Room and will help you get aquainted and NOT intimidated by Craft Room!

It really is great, no matter what your computer skill level is. Please take the first step and try Craft Room if you have not taken that step yet. I have done a few Ustream tutorials to help with Craft Room, but no one can do it better than Provo-Craft themselves!


This guide came from www.cricut.com and was assembled by
Erica’s Craft Room™ My Cricut Craft Room™
and Affordable Crafting Concepts™ Copyright 2009-2012

Visit the My Cricut Craft Room blog for 6-10 Cricut made projects each weekday.
http://mycricutcraftroom.blogspot.com


On Hello Thursday visit Erica’s blog for the projects made with the
newest cricut cartridges and the Cricut Craft Room files to go with them.
I will have a project made with them and all of the Cricut Craft Room files for them to make your crafting easier and less frustrating.

Never pay more than $34.99 for a Cricut Cartridge EVER again…..
www.shop.ericascraftroom.com

ALL Cricut cartridges $34.99 or less the DAY of release from Provo-Craft.
Create a Critter 2 & Suburbia, Now shipping
$34.99 each or $65 for both (September Bundle)
STOCK UP SALE!!!!
AND $5 shipping all weekend!
12x12 set of Cricut mats (Also work for the Imagine) $8
12x24 set of Cutting mats $12.50
Set of Regular Blades $7.50
Set of Deep Cut Blades $9


Click HERE to download this help guide.
Any suggestions are ALWAYS welcome!

Thursday, September 13, 2012

A lil summin summin for his lunch box


Todays theme is to create something for someones lunch..

I have been thinking on the idea of making little notes to send in my kids lunches. I have seen it all over Pinterest but have yet to do it.  Then this challenge came up and I knew this was my chance! I was finally going to make those funny little notes..just to make them smile or giggle a little while they are away. But then..a different idea popped into my head..what about Ben? What about the love of my life, the guy that does everything for our family? Why not make something for his lunch box? Now to make the decision of WHAT to make for him..do I want to go funny? Sentimental? NAH!! I like things SPICY!
I flipped through evey cartridge book that I have, knowing somewhere, something will jump out at me and scream..ME ME ME!! Then I found it, a simple little corset on the Tie the Knot cartridge..sexy and sweet at the same time.
 PERFECT!
I cut it out at 4" so not too big but big enough to make an impression ;)

I added a little glitter to it just to give it some umph..and of course I made it dark purple because that is his favorite color.
Now I would love to show you the backside of this, where I wrote his little note. But I think that is best left between him and I  ;) You guys can make your own romance!
Now onto making those funny little notes for the kids! LOL

I hope you liked my little lunch notecard, be sure to check out the rest of the Design Teams ideas..they always have great ones!

Tuesday, September 4, 2012

Card with a Window..FAIL!


So..it looks like I have some explaining to do. I signed up to create a card with a window this week, which I did, but didn't finish :(   Before you get all upset..let me explain..
I had this awesome window in mind and I knew with some hard core craft time I could accomplish it. However, once I got all the mechanics done, I never wanted to see the card again! LOL I poured a day into just the measuring, the moving parts, and the overall design for the basics of the card.
I got the mechanics, I got the scene, but I just couldn't get the outside the way I wanted. So I took the pics and decided I would show you all what I did so far.

This first pic is of the window closed..
(I apologize for the glare on the window, there was just no way to avoid it :()


And this pic is of the roman shade starting to open as you pull the tab on the top..


And this is the pic of the shade all the way up..


I used the Nursery Rhymes Cricut cartridge for the little boy silhouette. I thought he was perfect for the look of a little one checking the tree at night :) I also cuttlebugged each shade panel so that it didn't all match perfectly..giving it the appearance of an actual flowing piece of fabric.
For the most part, I like the card..but the tag and outside have MUCH to be desired! And to be honest I think after all of the hassle it was to engineer this bad boy, I am kind of tired of looking at it. I am frustrated with it I, so I will put it on the back shelf and come back to it when I am darn good and ready! LOL
So again I apologize for not having a finished project, but I am sure you can see where I was going with it. And I will be super upset if someone tells me that there is a tutorial for this kind of card somewhere, because I looked and looked to make sure this was my own original idea and I found nothing! (probably because no else is crazy enough! HAHAHA!)
Hope you enjoyed my "could have been better", "failed window" card. Please be sure to check out the rest of the design teams amazing projects today at http://mycricutcraftroom.blogspot.com 

Saturday, September 1, 2012

September 100 Cricut Cartridge Hop

Welcome!

You should have come from
LB http://www.coolbeansbylb.blogspot.com/

Woo Hoo! It's the September Blog hop! Its amazing how fast time has gone since I have become a My Cricut Craft Room Design Team Member! I have traveled well outside of my box and really expanded my horizons and crafting time. So thanks for coming and checking out my projects :)

First card I made is a Never Ending card. These cards are so fun! And even better, they are sooo easy to make! If you haven't tried to make one, I highly recommend it!
I made the card using glittered card stock and cut all of the details from the Celebrations Cricut Cartridge. There are so many fun party cuts on this cartridge!

Here is the front of the card..


Then you open it up vertically from the center..

The writing and music notes I made using a white gel pen.


Then you open it horizontally from the center..


Then you open it vertically from the center again..


Then you get the back of the card..the fun thing is you then open it horizontally from the center again..and you end up back on the front!
Like I said, its easy and fun..everyone loves getting this type of card, they think its a magic trick! LOL

My next project I made using the Calligraphy Cricut cartridge. I cut out the letters I wanted from 1 sheet of card stock and used the negative images left after removing the letters.
I then taped it onto my rock and used it as a stencil to paint it.
SUPER EASY! And it looks expensive! LOL
Wouldn't it be cute to do this on bricks to give to family and friends for gifts. I think I have a perfect soon to be married couple that will be receiving one! Probably should put their last name and not ours though! LOL


And last but not least..I signed myself up to make something with the Sugar and Spice Cricut cartridge. I again have owned this cartridge for quite awhile but never did more than look at the booklet after I got it. So what better way to get myself to use it then sign up for a challenge and make myself use it! LOL

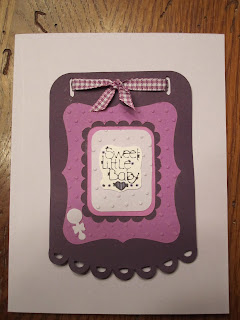
I used the multi layered tag from the cartridge, embossed 2 layers and glued them all together.

I made slots in the card thatched the slots on the tag. Then threaded the ribbon through and tied with a bow in the center.
I then added a sentiment from a stamp set that I have onto the center of the tag.

The little rattle that you saw on the front of the card is actually the piece punched from the interior of the card. It was too cute..I couldn't just throw it away!
The entire card was made using only shades of purple! Now that was a challenge all on its own!!

*BONUS*

So while making the tag card, I fell in love with the stork that is also on the Sugar and Spice cartridge. So I decided to make a couple of simple cards as back ups..we have LOTS of little babies coming in the next few months so I have to start stocking up! LOL
This is what I came up with..


Simple cards are new to me..I have always made complex cards that take me hours and hours to complete, but a friend of mine encouraged me to try simple. I have to admit, I am slightly addicted! I made 5 cards in less time that it usually takes me to make 1!! AWESOME!! UNBELIEVABLE! I cant wait to make more!!
Thanks for stopping by..don't forget to leave me a comment..I love comments!

Next you should hop on over to see Claire at


                                              Here is the line up in case you get lost along the way..
                       1. MCCR http://mycricutcraftroom.blogspot.com/


2. Kathy
http://3spoileddogs.blogspot.com/
3. heather
http://heathernovinger.blogspot.com/
4. Miranda
http://www.nanasscrapspot.com/
5. LB
http://www.coolbeansbylb.blogspot.com/
6. Amy
http://clayfulimagination.blogspot.com/