Tuesday, August 28, 2012

Birthday Present Card

Gosh how time flies..when you are a crafter! It's already time again for...


This week I got to make any kind of card for My Cricut Craft Room. The possibilities are endless, but I was in need of a birthday card. So needless to say, I made one!

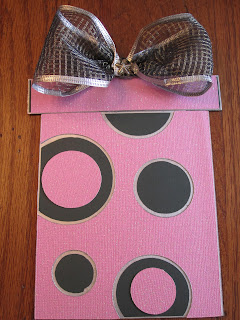
This card was made using the Celebrations Cricut cartridge. I simply chose the present key with the "card" function, hit "fit to page" (which ended up being 7 1/4") and WHOLAH! I had a present shaped card! Now I know I have expressed a few time to others that I never think to make a shaped card..so I finally decided to just do it! OMG! SO much fun!


And of course I cannot just leave it how it is, I have to alter it and make it my own! So I cut off the bow, leaving a short stub and added my own wire ribbon bow to it. I also added the star stud to the center to hold all of the ribbon together.  I attached the ribbon to the stub with Hot Glue.

I also cut off the "lid" and glued two of the three edges of the card "box" together to make...A Pocket!


To make the lid..I cut a piece of card stock and layered it to be used for the inside of the card. I then glued each side of the "lid" and laid my inside piece on one side, then laid the top part of the lid on top of that..pressed..and sealed it all together! BAM!  Now when I pull off the lid, the inside card comes out with it!

I used the Don Juan Cricut cartridge for the 30, on the inside of the card. I also used my EK Success edge punch (I cannot live without this punch!) to make the little swirls.

I cant believe my little cousin is turning 30! AHHH! She is crafty also and dabbles with the Cricut, so I cannot wait to give this to her!


I added a pair of lips and quote also from the Don Juan cartridge to stick into the gift as well..just to add a lil summin summin :)


I hope you are insired by my project and make one for yourself. I would love to see it if you do!

Be sure to check out the other amazing projects from some of the other design team members at
mycricutcraftroom.blogspot.com



Tuesday, August 21, 2012

Get Well Soon Waterfall card

Yay! It's that time again!

This week I volunteered to challenge myself to make a Get Well card. Ben's step daughter recently broke her leg so I decided to make this one for her. I wanted to make it fun, since she is only 12, so I chose a Waterfall card. I have made quite a few of these cards in the past and they are always well received.


As you pull the ribbon tab another image is exposed ..


And at the end, I added a Get Well sentiment.

You can then push the tag back up, and start from the beginning! How fun is that!
As you can see, there are lots of real estate that can be used making this type of card very versatile for many projects! I think you should give one a try!

I hope you enjoyed my card and that it inspires you to create your own!
Please go and check out some more great projects at http://mycricutcraftroom.blogspot.com

Check out the rest of my blog too, who knows, you just may find something you like! :)


Friday, August 17, 2012

Peanut Butter & Jelly

I was asked to make a housewarming card by a dear friend of mine, but it wasn't any ordinary card..she had some specifics.. YAY! So I accepted the challenge and I think it turned out fairly well!
First..here were the specifics: #1 It is for a housewarming gift.  #2 It needs to include something to do with peanut butter and jelly (thats what they call eah other)  #3 Would like to add the address or something personal to it to commemorate their first house.
Sounds like a great challenge and I LOVE challenges!
Here is what I came up with...

This is the card when you first pull it out of the envelope


And when you open it up..


The windows and grass were cut from the Sweet Treats Boxes Cricut cartridge.
The wreath was made using a snowflake paper punch as well as the little hearts and flowers.
I cut the door and embossed it to give it some depth.
Eveything else you see was cut by hand :)


Now the envelope was a little tricky! The card was so big and thick that a 12"x12" piece of card stock wasn't big enough! So I had to be creative, and experiment. After about 6 pieces of paper, I finally came up with this...

(front of envelope)
It is actually 1/4" thick to allow for the thickness of the card.

(back of envelope)
I thought it was fitting to make some more pb&j :)

What a relief to get done..now on to the next challenge! YAY!!

Let me know what you think by posting commenting below, I love to hear good things..and other ideas you may have!

*update*
Received a couple pictures of them opening their card :) Glad they liked it! :)

Wednesday, August 15, 2012

Haunted House Playset


This week I volunteered to make a 3-D project for My Cricut Craft Room.
I was so excited to make a project, I had it in my head of exactly what I wanted to make, then when it came down to it...I realized I was nuts! I didn't even own the Cricut Cartridge that I was using in my head! UGH! So I had to store away that idea and switch gears to make something that I did own.
I decided I really wanted to make a Haunted House, but I didn't want to use a "haunted house", I wanted to make my own! I started to flip through all of the booklets blindly, hoping that I would know what I was looking for when I found it. Then I stumbled across a cartridge that I had bought a few months ago (maybe 6 or 8) but had yet to use..and then I saw it!  It was perfect..it was a light bulb moment..I couldn't wait to get started!
I decided to turn the cutsie house box from Sweet Treats Boxes into a haunted house! YES! My plan is hatching perfectly..MAHAHAHA!


But I couldn't stop there..oh no, that just wouldn't be the "Amy Way"! I had to make it usable, and fun!
A Play set! That's what I need! How fun would that be for the Lil uns to play with?!!
I decided to make some figures and accessories to go with the house..


Yep! That should do it! I also made a green paper covered piece of cardboard for the "grounds".
Then I couldn't wait to play with it..I mean test it, to make sure it worked. :)


And then one of the best parts..you can open the house to put a monster inside while playing...or...to store all of the pieces!!  Function! I love function!! LOL


I think the kids are going to have a blast with this! (which is why I didn't put too much time or detail into it, I just know it wont last long! LOL)

Now on to the details so you can recreate it and make your own.

I cut the house at fit to page for a 12x12 inch cardstock from Sweet Treats Boxes. I then cut the windows, door, and roof to match the same size.

The monsters and vampire are cut from the Mini Monsters Cricut cartridge. They are all cut at 1 1/2".
Then using the Happy Hauntings cartridge I cut the gate, tree and gravestones.  The gravestones were cut at 2", the gate was cut at 3", and the tree was cut at 4 3/4". 
After all of the accessories were cut and assembled I  folded a 12x 1 1/2" piece of cardstock (I chose green to match the "ground") and folded it in half lengthwise. I then attached all of the accessories onto the folded strip of paper and cut them apart..leaving a little or a lot exposed on either side of the figure. After all of them were cut apart I took my scissors and cut the exposed parts with my scissors to give the look of grass.  Now they will all stand and allow for dimensional play!

I hope you enjoyed my project today! You should check out my other Design Team sisters projects too! Go to http://mycricutcraftroom.blogspot.com

Thanks for stopping by!

Friday, August 10, 2012

Plaid Shirt Card and Turn Back Time Easel Card

It was a warm and beautiful day, I was relaxing outside without a care in the world, then I remembered something..OH NO!! Fathers Day is almost here! I have to make cards! AHHHH!!!
So I rush to my trusty pinspiration board and look for what  I had pinned just for this occasion! Ah, yes! A plaid shirt gift card holder for Bens dad..PERFECT!


Many grueling hours later this is the finished project. I decided to hand sew the stitching on the pocket and collar..they are not perfect but it adds character, right?!! LOL I then sewed opaque buttons to the card also just to finish off the look. Remember one thing if you are going to make this yourself..don't glue all the edges of the pocket down if you intend to use it as a pocket! UGH!! Sometimes I get ahead of myself and make mistakes..but they are happy mistakes! HAHAHA!!

Now..What to make my own dad?
The gift of time...

I started with stamping clocks randomly on and off the edges of the card, but then
I wanted to try something new..so I embossed with embossing powders and a heat gun! How fun!
I also added some of Tim Holtz's gears to bring more dimension to the card.


Then I Easeled it! BAM!
Now he can display his card and remember that he needs to make more time, for me! LOL

And of course he needed and envelope to match :)


(I learned that I should have experimented with the embossing powder before putting it on my project, but I like to live dangerously and jump head first!)

Hope you enjoyed my Fathers Day Cards  :)

3-D Flower Cart - Pinspired

I have been Pinspired yet again! I found this amazing flower cart pin on Pinterest and I knew I had to try it!
I had the perfect victim (recipient) in mind..Bens Mom! YAY! Mothers Day was coming up and I had to think fast on what to make her, then pin happened! LOL It was like a gift from the Pinterest sisterhood of craft makers, gawkers and inspirationers! (is that even a word?! LMAO) So I got on it, I went to http://wanderingscissors.blogspot.com and printed the template. I then cut everything from thin cardboard because I wanted it to be sturdy. Unfortunately not everything went together smoothly so there were a few tweaks that had to be made, but that's what keep me on my toes!
Here is the finished product..


I cut every piece of "wood" and hand embossed it to be wood grain textured. Then I added fake flowers that I just happen to have here for another project, by pulling them off the stem and hot gluing them to the top flap.  I love details on my projects!


So, not only is it the cutest flower cart, it opens up too! OH MY!! 
I added a little heart charm for her to be able to open it easier. 
And believe it or not, it even rolls just like a wheel barrow!

I love this template even though this has been my only opportunity to make one, I have stored the template in a safe place and darn well intend on using it again! :)


Thursday, August 9, 2012

Diamond Fold Card

I always love finding a really cool new or different fold for cards, and when I do..I cant wait to make one! When my friends Grandfather passed away, I knew I wanted to make her something different. I wanted to make a card that she could display to remember him but not have it as a constant reminder that he is gone. And this is what I came up with..

A Diamond Fold Card. I had never seen one before, it looked complicated but simple and I knew that was what I needed to make her!
Something that she can diplay, but not have the "sympathy" or "sorry for your loss" written on it.
The fold just has an interesting effect to me..it is ever changing depending on how far you open it. I look forward to making more and seeing what else I can do with it!
If you havent made one I strongly suggest you do..just to help think outside of the square box for a bit. :) And when you do, or if you have, I would love to see it! I love being inspired!


Monday, August 6, 2012

CCR Cartridge..ZOMBIES!!


YAY! Its Monday! BAHAHHA! Who really says that?
Today I made an awesome project using the CCR Exclusive cartridge  ZOMBIES!
I happen to have a couple of boys that have their whole plan of what to do if there is a zombie take-over! So I decided that they needed a place to write their plan and keep it safe for the future..(and so I can put it in their keepsake box later in life ;)) I took a plain composition book and a couple of elements from the cartridge..


..how cute are these!?!!
I then cut them out of thin cardboard..and with a little magic...

I came up with this! I used a tutorial I found at http://davelowe.blogspot.com to help me with all of the basic elements.

The look and feel of this notebook is really cool, and to think it is just a Viva paper towel!

I painted the whole thing black then went over it some of the elements with green or gray to make them "POP".


My kids love it! Looks like this mom will be making lots of comp books for the boys' and their friends this year for school!

I hope you enjoyed my project today! Be sure to check out more awesome projects from my Design team sisters at http://mycricutcraftroom.blogspot.com

Friday, August 3, 2012

August 100 Cricut Cartridge Blog Hop

 
Welcome to Erica's Craft Room
100 Cricut Cartridge Blog Hop Day One
You should have started at http://mycricutcraftroom.blogspot.com/ if not please start at the beginning.

Welcome to My Cricut Craft Room's August 100 Cartridge Blog Hop

Collectively the design team uses over 100 different Cricut Cartridges in their projects during the two days of this hop.
 What an exciting weekend!!

As special treat enjoy 10% off of your total purchase with Erica's Craft Room Store.
Use the code AUGUST to see 10% off of your total purchase (No exclusions)


I have made a few projects to share with you today, so lets go check them out..

My first project was done using the Robotz and Indie Art Cricut Cartridges.
Obviously my fingers are not included in the card, but I couldn't get the lil booger to stay closed long enough for its picture! He was just bursting with excitement for his big debut! LOL


I opted to make a dimensional card that I learned how to make from a pin I found on pinterest. I wanted something that can stand and be displayed on its own, but not necessarily an easel card.


The robot is cut at 5 1/2" and the large gear was cut from the Indie Art cart at 6 1/2". the smaller gear that is directly under the robot was cut at 4 1/2".

I made my next project using Word Builders; A Word Party. I made this for my 2 year old nephew, we are going to frame it and hang it in his room.


What a cute cartridge! I have had this one for awhile , but never used it! Boy was I missing out! Look how cute this is!!
Everything was cut at 5".


I altered the train by taking off the cow pusher.( because we all know Thomas doesn't have a cow pusher! LOL)
This cartridge does not have many "layers" so I made my own :)
 And, (although I think it would be a great idea for a cartridge,HINT, HINT)  I drew my own "Thomas" face. Its not perfect, but Johnny doesn't care! LOL


Notice how his name is long enough to use all of the rainbow colors?
So this project is becoming a multiple learning tool too!


Now, notice something else? Thomas is #1 and the Caboose is #8..now he can learn to recognize his letters, name, colors and numbers!! (I will be adding the remaining numbers to the letter cars, and brads in between everything to hold it together at a later date to finish the project)
DANG! I am a great Aunt! LOL

All of the black that you see on the project is actually a marker. My intention was to laminate all of these and let him play with them, and didn't want all of the extra bulk, but Thomas turned out so well that we decided to frame it...don't worry I will make him one to play with too! :)

Onward to the next project..shall we?..

I made a card using Elmos Party and Create a Critter Cricut cartridges.
I was in a mood to make a landscaped card. I am not sure if that is its official name, but it is what I call it. And I wanted to be able to use the cartridge for something other than a kids party, so I challenged myself to think outside the box and try something new..again!


Who doesn't love watching Elmo fly his kite in the park?!!


Elmo was cut at 2" using the Elmos Party cartridge and the trees and sun were cut at multiple sizes from the Create a Critter cartridge.
I love this card..it is simple but complicated.


Bonus Project!!

I made an extra project, a fun card (and matching envelope of course) for my not so little anymore cousin graduating from Luther college..and yep I used the Elmos Party! ( I told you I wanted to use the cartridge for something other than a kids party!)


All of the notes were cut at various sizes.

I embossed the music notes with my cuttlebug folder, I also hand embossed all of the raised notes on the card and envelope with my ScrapBoss embossing tools.


He is a very talented young man and although he sings more than plays piano, I will always remember him astonishing us while playing on Nanas piano at such a young age. He has an amazing future to look forward to and we are so proud of him.

I hope you enjoyed my very long blog today. Now its time for you to hop on over to


If you get lost along the way, here is the line up..
MCCR http://
mycricutcraftroom.blogspot.com/ jenn lorist http://
www.jennspapercrafts.blogspot.com/
Teresa http://
www.createenjoyshare.blogspot.com/
Kathy http://
3spoileddogs.blogspot.com/
shelley http://
shelley-scrapbookingforfun.blogspot.com/
heather http://
heathernovinger.blogspot.com/
Jessica S http://
jessicascraftshaque.blogspot.com/
Tammy - http://
www.Cuttinandstampin.blogspot.com/
Jen L http://
www.mybusycraftylife.blogspot.com/
Erica's Projects http://
ericasprojects.blogspot.com/
Samantha http://
www.samanthascricutcreations.blogspot.com/
robin http://
create-a-latte.blogspot.com/
amy http://
clayfulimagination.blogspot.com/
Miranda http://www.nanasscrapspot.com/
Angie http://
crazyscraplady-angelpie.blogspot.com/
LB http://
www.coolbeansbylb.blogspot.com/
Cathy http://
cathyplus5.blogspot.com/
Claire http://
threewaterscreations.blogspot.com/
Lisa Carrier http://
ourcraftingcorner.blogspot.com/
Blog Candy http://
ericasblogcandy.blogspot.com/